Ever changed a webpage and wondered what happens to the old link? Or maybe entered a link that a friend sent you, and suddenly you see a different URL? Meet the 301 redirects, your new best friend in website management. This guide will break down what a 301 redirect is, when to use it, and how to avoid common mistakes. Get ready to make your website smoother and more user-friendly. Let’s dive in!
What are we going to cover today?
Why 301 Redirects Matter
So you’ve got a website—awesome! However, managing a website isn’t just about creating new pages and content. Sometimes you have to move stuff around or take it down. When you do, you risk losing visitors and the SEO juice you’ve built up. This is where 301 redirects come into play. A 301 redirect is your go-to tool for guiding users and search engines to the right new place, preserving your traffic and SEO rankings. Knowing how to use them effectively is crucial for any website owner or manager.
Now that we know why they are important, let’s continue with an explanation of what 301 redirects are exactly.
What are 301 Redirects?
A 301 redirect is essentially a change-of-address form for your website. When you switch up a URL or take down a page, this tool ensures that anyone clicking the old link is automatically transferred to the new page. If you’re new to the world of SEO and website management, mastering 301 redirects is a crucial skill. It’s not just about user experience; it’s also a game-changer for retaining SEO benefits.
For those just starting out, our SEO beginner guide can provide further insights into how this fits into your overall strategy. So, whether you’re reorganizing your site or updating old content, 301 redirects are your go-to for seamless transitions.
Step-by-Step: Setting Up a 301 Redirect
Ready to set up a 301 redirect but not sure where to start? You’re in the right place! Whether you’re using a popular CMS like WordPress, Wix, or Squarespace, or you’re looking to manually configure it on your server, we’ve got you covered. Follow these straightforward steps to get your redirects up and running smoothly.
Doing It in a CMS
If you’re running your website on a Content Management System (CMS), setting up a 301 redirect is often a piece of cake. CMS platforms usually have built-in tools or plugins that make this task a breeze. No need to mess with code! Whether you’re using WordPress, Wix, Squarespace, or something else, we’ve got step-by-step guides for you.
WordPress

- Login to your WordPress Dashboard: Access your site’s backend.
- Install a Plugin: Navigate to ‘Plugins’ > ‘Add New’. Search for a plugin called ‘Redirection’ and hit ‘Install’ and ‘Activate’.
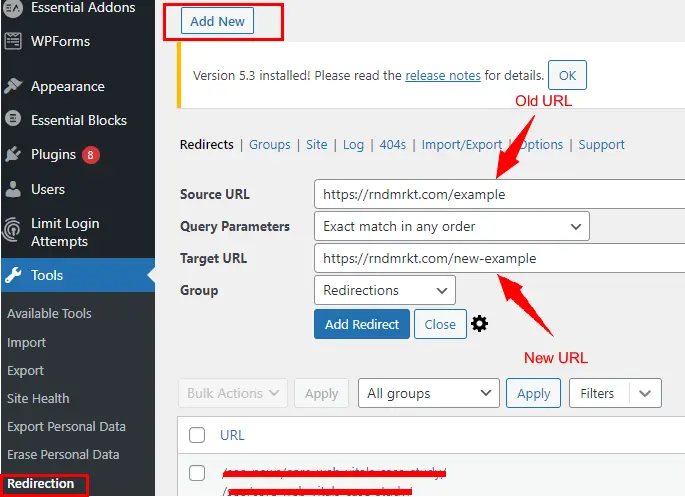
- Set Up Redirect: Head over to ‘Tools’ > ‘Redirection’. You’ll see fields to input the ‘Source URL’ (your old URL) and ‘Target URL’ (your new URL).
- Save: After entering the URLs, click ‘Add Redirect’. Voila, you’re all set!
Wix

- Access Wix Admin Panel: Log into your Wix account.
- Go to Settings: From the sidebar, click on ‘SEO’.
- Locate URL Redirect Manager: Scroll down to find ‘Advanced SEO settings’, and click on ‘URL Redirect Manager’.
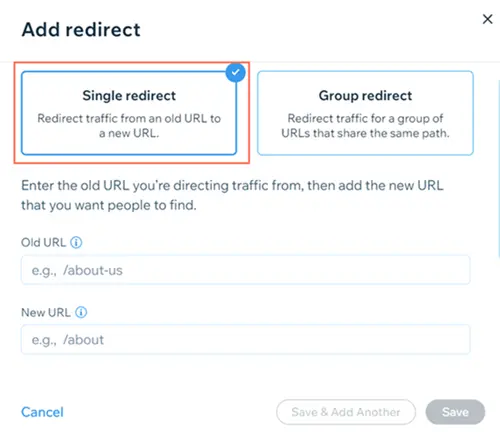
- Input URLs: Enter your old URL and new URL in the respective fields.
- Confirm: Click ‘Save’ to apply the changes.
Squarespace
- Login to Squarespace: Open your Squarespace dashboard.
- Navigate to Settings: Choose the ‘Advanced’ option.
- Pick URL Mappings: This is where you’ll set up the redirect.
- Enter Redirect Info: In the text box, type your old URL, add a space, then type ‘->’, and finally your new URL.
- Apply Changes: Click ‘Save’ to make it official.
Magento

- Log in to Admin Panel: Open your Magento admin dashboard.
- Navigate to ‘Marketing’: On the left-hand sidebar, you’ll find a ‘Marketing’ tab. Click on it.
- Select ‘URL Rewrites’: Under ‘SEO & Search’, you’ll see an option for ‘URL Rewrites’. Click on it.
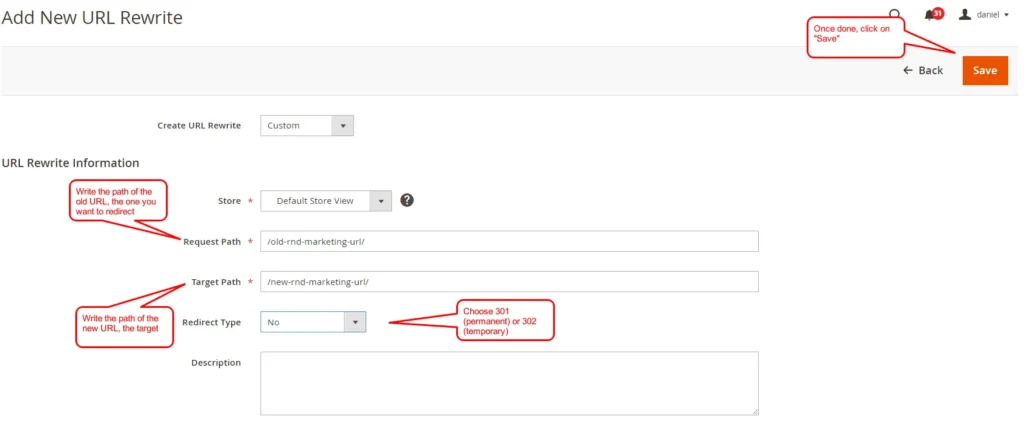
- Add New Redirect: On the top right corner of the ‘URL Rewrites’ page, you’ll find an ‘Add URL Rewrite’ button. Click on it.
- Fill Details: You’ll be prompted to select the ‘Create URL Rewrite’ type. Choose ‘Custom’ and add all the details as explained in the image above.
- Save and Flush Cache: Once you’ve filled in the necessary fields, click the ‘Save’ button. After saving, it’s a good idea to flush Magento’s cache to ensure the changes take effect immediately. This can usually be done from ‘System’ > ‘Cache Management’.
Other CMS
If you’re using a less mainstream CMS like Joomla, Drupal, or Magento, the exact steps might differ. But don’t worry—these platforms usually offer in-depth guides to help you out. Just consult their official documentation for specific instructions on setting up 301 redirects.
Manual Setup: How Real Geeks Do It 😜
If you’re comfortable with tech and like to control every aspect of your website, setting up 301 redirects manually is right up your alley. This gives you the freedom to implement redirects exactly how you want. Here’s how to do it:
1. On the Server
- FTP or SSH Access: Use an FTP client like FileZilla or SSH into your web server to access the files.
- Find the Config File: Navigate to the server’s configuration file. For Apache servers, this is usually called ‘httpd.conf’. For Nginx, it’s often ‘nginx.conf’.
- Edit with Care: Open the config file in a text editor. Add your redirect rule at the appropriate section. In Apache, the line would look something like:
Redirect 301 /old-page.html http://www.yourwebsite.com/new-page.html - Save and Test: Save your changes and restart your web server to apply the redirect. Always test to make sure it’s working as expected.
2. Using .htaccess
- FTP to Root Directory: Use an FTP client to access the root directory of your website.
- Locate or Create .htaccess: Find the
.htaccessfile in your root directory. If it’s not there, you can create one using a plain text editor. - Add Redirect Rule: Open the
.htaccessfile and add your 301 redirect rule. The syntax is generally like this:Redirect 301 /old-page.html /new-page.html - Save and Confirm: Save changes to the
.htaccessfile. Upload it back to the server if you edited it offline. Always test the redirect to make sure it’s functioning as planned.
Now that we know how to create 301 redirects and what they are exactly, let’s see what are the main use cases of 301 redirects.
Why & When to Use a 301 Redirect
Setting up a 301 redirect isn’t just a technical task; it’s a strategic move. Understanding when to use it can save you from losing traffic and dropping in SEO rankings. Let’s go through some common scenarios where a 301 redirect would come in handy.
URL Changes
Changing a URL isn’t just about aesthetics or updating a product name; it’s often a strategic move for SEO. However, a new URL means the old one will break, leading to 404 errors. That’s where a 301 redirect steps in. By setting it up, you make sure that all the traffic and SEO value of the old URL gets transferred to the new one. It’s like forwarding mail to your new address but for your website.
One of the things we always look at as part of our SEO consultancy services is internal links that lead to 404 pages that weren’t redirected properly. The old URL is changing? Redirect it to the new one and make sure to run a search and replace that will help you change links with the old URL to the new one. By doing that, you avoid linking to 404 or 301 pages.
Revamping Old Content
When you update an old blog post or modernize/improve a landing page, you’re not just changing the content; often, you’re also updating the URL to match. Without a 301 redirect, anyone who clicks on links to the old URL will hit a dead-end. Setting up a redirect ensures that all the hard work you’ve put into the original content isn’t lost. Plus, you retain all the SEO benefits like backlinks and rankings.
Merging Multiple Posts Into One
If you’ve got multiple blog posts or articles covering similar topics, merging them into a single, more comprehensive post can boost your SEO. It’s a form of content consolidation that improves user experience. In addition, it helps you avoid cannibalization issues (where a few pages compete for the same keywords).
The key is to set up 301 redirects from each of the old, individual posts to the new, combined one. This way, you’re not splitting traffic or SEO value between multiple pages.
New Domain? No Problem
Switching to a new domain is a big move, whether you’re rebranding or just want a better domain name. It’s crucial to maintain the SEO equity you’ve built up over the years. With 301 redirects, you can seamlessly transfer all the existing traffic and SEO value from the old domain to the new one. It’s like moving houses without losing any of your stuff.
Phased Website Launch: The Smart Way
If you’re rolling out a new website in stages, managing traffic during the transition is crucial. By strategically using 301 redirects, you can guide visitors from old pages to corresponding sections on the new site as they go live. Not only does this retain your audience, but it also signals to search engines that your content has moved, helping to maintain your SEO rankings.
301 vs 302: Know the Difference
Choosing between a 301 and a 302 redirect might seem like a minor detail, but it’s a critical decision with significant SEO implications. Each type of redirect serves a specific purpose and communicates different information to search engines. Let’s dive into the nuances.
Here’s a quick comparison table to highlight the differences:
| Aspect | 301 Redirect | 302 Redirect |
|---|---|---|
| Permanence | Permanent | Temporary |
| SEO Impact | Transfers SEO value | Usually doesn’t transfer SEO value |
| Use Case | Long-term changes like rebranding or content consolidation | Short-term changes like A/B testing or seasonal promotions |
| Search Engine Behavior | Tells search engines the page has moved permanently, updates index | Tells search engines the move is temporary, usually retains the old index |
Why 301?
A 301 redirect is used for permanent changes. It tells search engines that the old URL has moved to a new location forever. This is crucial for keeping your SEO value, as Google and other search engines will transfer the SEO ‘juice’ from the old URL to the new one. Use it for situations like rebranding, changing domain names, or permanently moving content.
Why 302?
On the other side, a 302 redirect is for temporary changes. Maybe you’re running an A/B test or have a seasonal promotion page. A 302 tells search engines that the change is short-term, so they shouldn’t update their index. This means the original URL retains its SEO value, but the downside is that the new URL won’t gain any.
Case Studies: Real-Life 301 Redirect Wins and Fails
Learning from real-life scenarios can give you invaluable insights. Let’s look at both a win and a fail when it comes to 301 redirects.
The Win: A Tech Company’s Successful Rebrand
A tech startup decided to undergo a rebrand, complete with a new domain name. Knowing the SEO risks involved in changing domains, they meticulously set up 301 redirects for every existing URL to their new domain. The outcome was impressive: not only did they maintain their existing web traffic, but their SEO rankings actually improved.
This case exemplifies how 301 redirects can preserve and even enhance the SEO value accumulated over time.
The Fail: Mishandled Platform Migration
A well-established tech blog decided to switch hosting platforms to avail more features and scalability. In the rush and excitement, they overlooked setting up 301 redirects for their existing content. The result was terrible. Web traffic took a nosedive, and their hard-earned SEO rankings plummeted as well. Their oversight turned existing URLs into 404 errors, essentially erasing years of SEO work.
This serves as a cautionary tale of how failing to use 301 redirects can result in significant setbacks.
Action Steps for Mastering 301 Redirects
Managing 301 redirects effectively involves more than just knowing how to set them up. Here’s a comprehensive list of action steps to make sure you’re on top of your redirect game.
- Audit Your Site: Consistently check your website for broken links or outdated content. Tools like Screaming Frog or Google Search Console can help automate this process.
- Plan Ahead: Whether it’s a rebrand, site migration, or content overhaul, make 301 redirects a central part of your strategy from day one.
- Consult Your CMS Guides: Before making any changes, consult your CMS documentation or support channels to understand the best practices for setting up redirects.
- Backup Before You Act: Always back up your website before implementing any changes, including setting up redirects. This gives you a safety net in case things go awry.
- Implement Redirects: Use the appropriate method for your platform, whether it’s through a CMS plugin or manual server adjustments.
- Test, Test, Test: Never assume your redirects work without testing them. Use tools or simply click through to ensure everything redirects as it should.
- Monitor SEO Metrics: Keep an eye on your site’s performance metrics using tools like Google Analytics. Look for any changes in traffic patterns, bounce rates, or SEO rankings.
- Update Internal Links: While 301 redirects will handle old URLs, updating your internal links to point to the new URLs is a best practice. This can improve your SEO results.
- Review and Iterate: Regularly review your redirect strategy to make sure it aligns with any new changes or updates to your website.
- Educate Your Team: Make sure everyone involved in website management understands the importance of 301 redirects and how to implement them correctly.
By following these action steps, you’ll be well-equipped to manage 301 redirects effectively, ensuring a smooth user experience and maintaining your SEO performance.
Conclusion
That’s our full take on 301 redirects – what they are, when to use them, and the crucial role they play in your SEO strategy. These aren’t just tiny tweaks; they’re vital moves that can seriously impact your website’s success. Whether it’s retaining traffic or keeping that SEO ranking you worked so hard for, 301 redirects are your silent strategists.
If you’re feeling a bit overwhelmed with all the technical details, don’t sweat it – RnD Marketing is here to help. Our specialized SEO services can manage all the ins and outs for you, from auditing your site to setting up and monitoring your 301 redirects.
Don’t let your valuable SEO efforts go down the drain. With RnD Marketing, you can make every click, every link, and every SEO opportunity truly count.
Frequently Asked Questions
A 301 redirect permanently moves one URL to another, helping you retain SEO value and direct traffic to the correct page.
Use a 301 redirect for permanent changes like rebranding, URL changes, or merging similar content into one page.
Yes, you can set it up via your CMS or manually on the server. However, if you’re unsure, it’s best to consult professionals.
A 301 redirect is permanent and transfers SEO value. A 302 is temporary and typically retains the SEO value at the original URL.
If done correctly, 301 redirects preserve or even improve your SEO by transferring the “SEO juice” from the old URL to the new one.


